Topographic Profiles
A very useful exercise for understanding what topographic maps represent is the construction of a topographic profile. A topographic profile is a cross-sectional view along a line drawn through a portion of a topographic map. In other words, if you could slice through a portion of the earth, pull away one half, and look at it from the side, the surface would be a topographic profile. Not only does constructing a topographic profile aid in understanding topographic maps, it is very useful for geologists when analyzing numerous problems.
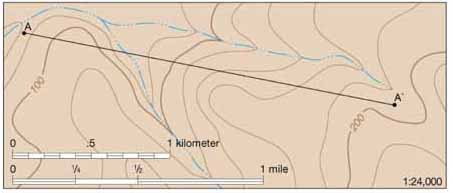
To construct a topographic profile, you must first decide on a line that is of interest to you. This could be an area where you want to go for a hike and want to know how steep to expect it to be, a line that shows the maximum relief (relief is the difference in elevation between the highest and lowest points) in the map area, or any other area in which you are interested. Once you have determined where you want to draw your profile, use the following guidelines to construct your profile.
 1)
Pencil the line of your interest in
lightly on your map.
1)
Pencil the line of your interest in
lightly on your map.
 2) Place a blank piece of paper along the
line you have drawn.
2) Place a blank piece of paper along the
line you have drawn.
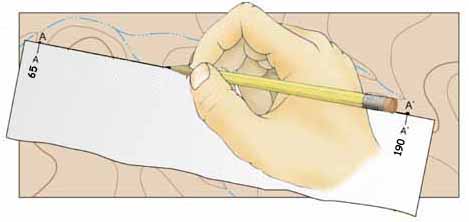
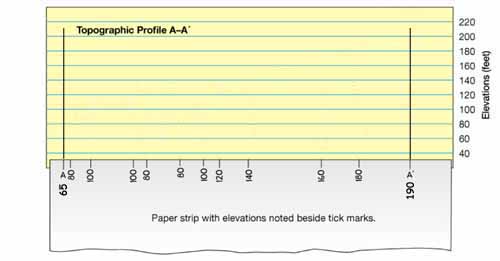
3) On both the blank paper and the map, mark clearly the starting and ending points of your line of section. Below these marks, write down the elevation of the starting and ending points of your section.
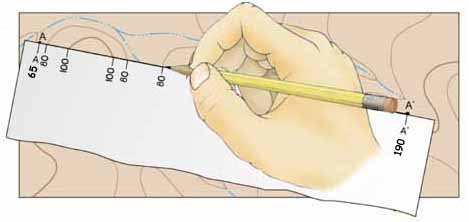 4) Make a tic mark wherever the paper crosses a contour line
on the map, making larger tics for the index contours and smaller tics for
the intermediate contours. Write the elevation of the index contours
below their tics on your paper. You might want to start off writing the
elevation of the intermediate contours as well to avoid confusion, but it
will soon become tedious.
4) Make a tic mark wherever the paper crosses a contour line
on the map, making larger tics for the index contours and smaller tics for
the intermediate contours. Write the elevation of the index contours
below their tics on your paper. You might want to start off writing the
elevation of the intermediate contours as well to avoid confusion, but it
will soon become tedious.
Make a note of the highest and lowest points on the profile for use later. Be sure to keep track of the number of intermediate contours between the major contours; if there are more than four intermediate contours it means that there has been a change in slope and you need to check to see if you crossed a hill or a valley.
 5) Once you are certain you have all of the appropriate
tic marks and elevations, remove your paper from the map. Get a
piece of graph paper that is at least as long as your line of section. Place your paper with the tic marks on the graph paper and mark the starting and ending
points of your line of section on the graph paper.
5) Once you are certain you have all of the appropriate
tic marks and elevations, remove your paper from the map. Get a
piece of graph paper that is at least as long as your line of section. Place your paper with the tic marks on the graph paper and mark the starting and ending
points of your line of section on the graph paper.
 6)
Draw vertical lines above your starting and ending points, these will be
the boundaries of your profile.
6)
Draw vertical lines above your starting and ending points, these will be
the boundaries of your profile.
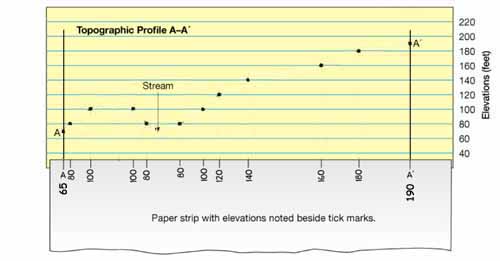 7) Beginning with your
starting elevation, go directly above the tic mark on your paper and make
a small dot on the graph paper at the corresponding elevation. Make a small dot for each tic mark on
your paper.
7) Beginning with your
starting elevation, go directly above the tic mark on your paper and make
a small dot on the graph paper at the corresponding elevation. Make a small dot for each tic mark on
your paper.
 8)
Connect the dots on the graph paper, and you have a topographic
profile.
8)
Connect the dots on the graph paper, and you have a topographic
profile.